On my way home from work on beautiful dark July night, my headlights suddenly went out; -then back on; - then out; -then back on.
This could have been the beginning of a suspense thriller, but fortunately it was only some minor car trouble. Having just purchased the car, I did not really know it "inside and out" yet, so the next day I spent quite some time searching for loose wires. Somehow it always took some time to make the lights go off and on, but once they started, they just kept on flashing. I did not find any loose lead- or ground wires, so I started to suspect that my headlight switch was dead, or at least singing on its last verse...
Then I spoke to a fellow who told me to check if my headlights had ever been replaced. Of course they had! I had headlights with the European H-4 standard bulbs. That was the source of the problem.
"Why have you changed your headlights?", you might ask. The reason why you should consider it is obvious: brighter and better lights and cheaper bulbs which you can pick up at any gas station. If you want to/need to replace your European headlights, the ones from the Volvo140/240 series are a perfect match.
OK, this is what happens:
If you have aftermarked, new type of headlights, with the H-4 bulbs, the resistance in the headlight circuit will be higher than what it was with the original bulbs. The headlight circuit is not connected to the circuit board, but is taken care of by a temperature-controlled circuit breaker in the headlight switch. When the resistance increase in the circuit, the switch warms up, and the circuit breaker in the headlightswitch breaks the circuit. When the switch cools down enough, the circuit is once again closed. Because the temperature is higher than when you first turned on the lights, the circuit breaker will break the circuit sooner than the first time the lights went out. The procedure will go on and on, and your lights will blink.
Before you get started, acknowledge this: Due to different wiringdiagrams and colorcodes on the wires, please refer to your vehicles wiringdiagram for correctness. The colors in the instructions below are correct for '66. However, once you get the colors right, the method is similar for the other models. Make sure you disconnect the ground terminal from your vehicles battery before you begin working on the electrical system.
This is how you deal with the problem:
You will need to buy a double headlight relay and some connectors. Begin by identifying the different wires and double check so you are certain which goes where. Then cut the wires going from the dimmer to the headlights about 10 inches above your dimmer switch. Check the wiring diagram for your relay, and let the current coming from the dimmer switch control the relay. Then pull a new lead from the emergency lights or the accessory circuit and plug it to the input terminal on the relay. I took mine from the contact for the Rally-Pac. This circuit can handle the new bulbs. The other part of the wire you cut, the one going to the headlights, is then connected to the output terminal of the relay. Finally ground both relays. Recheck all connections, reconnect your battery and your lights should be working fine!
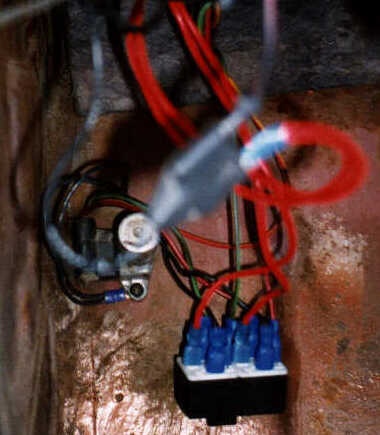
In the picture above, the complete installation in my '66 is shown. I have added a double lightswitch relay, which is the black box in the lower part of the picture. In addition, there's a double groundwire(black), going from the floorboard below the dimmerswitch to each of the two relays. The red/ yellow wire is the lead from the headlightswitch. The red wires coming from the Y-connector, out of focus in the picture, are my new leads. The green/black- and the red/black wire going between the dimmerswitch and the relay, are used to make the relays switch on/off, while the green/black- and the red/black wire from the relay through the firewall, are the leads for the high and low beams. For a complete wiring diagram, see http://home.c2i.net/vidar.christoffer/mustang/.
If you decide to change your headlights, you also need to change the connection at the base of the bulb, but this is self-explanatory, so I'll leave it to you to figure out how to do that. Good luck with your new lights.